11/14/11

Show time! Some Helpful Tips from Jennifer Kahn

It's that time of year. Craft show time. If you're like me, you are crazed and working away. It's stressful but exciting. I've had several friends who are new to the scene recently write me with some questions on how to prepare for their first show. Now I know there's more than what I have below but this is a good start. I hope this helps!

For starters: Make your life easier with a good folding cart. This one at handtrucksrus.com is amazing. It folds up so small for storage and opens up so huge for carting all your wares. It fits in your car and hides well under your table.


Display: Make your display inviting, yet simple, clean. Tie it in with your work and your style but don't let it compete with what you're selling. I've always found great display items at TJ Maxx, Joanne Fabrics, Pier One and on Ebay and Etsy. Have a table cloth that hangs to the floor so you can hide stuff under your table. Make sure to have a comfy enough chair but stand as much as you can. Be sure to have a mirror if your items are jewelry or clothing or other wearable goods. Make sure your prices are visible. The lighting is never great at shows so it's a good idea to bring your own lights (and extension cord). You don't have to go crazy though. I just set up a desk lamp on either side of my table and really clamp them down well with extra c-clamps.

Banner: You need to have a nice banner so people can find you in a crowded show. I only had to look as far as Etsy to find a banner maker who was fast, affordable and friendly. His name is Paul Wilson and his Etsy shop is Wilson Graphics. He can print whatever you want on thick vinyl complete with grommets and he has a variety of sizes. I chose the 1' x 3'. It only cost $22 + $10 shipping and I received it 4 days after I ordered it! (Although this was 3 years ago, his prices may have gone up.)

Change: I think it's good to have 20 $1s, 4 $5s and 2 $10s. Also change for the meter! I recommend using a modern fanny pack type bag to keep your money on you, instead of a cash box. Be sure to have a calculator, I always check it twice just to be sure I didn't punch the numbers in wrong.

Credit Cards: Now thanks to IPhones and Square, vendors can take credit cards. This is a great thing! I've been using it for a year and I've had no problems. I've made more sales because of it.

Packaging: It would be easy to go nutso here but simple works. Look for boxes and bags that are made from recycled paper. Re-use tissue paper that you've gotten from purchases. Buy or make a custom stamp of your logo to stamp on your boxes and bags. I made mine by carving away at a rubber stamp - something Celie Fago taught me.

Business Cards/Postcards
I love my mini moo cards. They are small but sturdy cards, you get 100 for $19.95 but the best part is, they can be 100 different images! It's so great to be able to get a variety of images and not be limited to just one. I picked 20 images of what's currently available in my Etsy shop and got 5 of each. Always put a card in your box and have them out on your table for people to take.

I get business cards and postcards from Overnightprints.com. They have good prices and quick turn around time. I like to go with a matte finish and rounded corners. The more you buy the cheaper it is. During the holiday season I pick a great image of my work (or multiple images) for the front and list my show schedule on the back.

Food: Bring snacks, lots of them. Things that are easy to eat - not messy and things that aren't going to give you offensive breath! If you drink coffee, chew gum or mints after!

Stickers: Always good to have stickers to give to the lil ones so their parents can have a minute to look.

Show Day: Remember to advertise your shows on Facebook, Twitter, your blog, your website, etc. Especially on the day of your shows to remind folks. Get there early. Always better to have more time to set up and you never know if you'll need to run out for last minute items. Try to always have something to work on during slow times. Smile! You'll learn as you go and the more shows you get under your belt, the easier and more streamlined your whole system will get!

Some extras to remember:
extra price tags
permanent marker
pen
paper
water

scissors
tape
advil
tissues
hand sanitizer
lip balm
paper towels
paper bag for garbage
mailing list sign up
camera

Okay, that should do it... Best of luck vendors!

5/3/11

EMC Charity Charm Bracelet!

Awhile ago the EMC Team had a charm exchange. All of the participants made extra charms with the hopes of donating a complete charm bracelet to a worthy cause. After some discussion the team decided to donate the latest charm bracelet to the Red Cross through Ebay Giving Works. 100 % of the sale of the Charm bracelet will go to the Red Cross. Please view the ebay listing here. The Charm Bracelet auction will end on May 12th! Please spread the word on this lovely bracelet it is for a good cause!


Description of Bracelet

This charm bracelet is composed of a sterling silver 7.5 inch cable chain with 21 handcrafted fine silver, copper and bronze charms. The charms range in size from 1/2 inch to 1 inch. These handcrafted charms were made by members of the Etsy MetalClay Team. The Etsy MetalClay team is a global group of jewelry artists and designers using silver, gold, copper and bronze metal clays to create their work. We strive to make innovative, unique, and boundary pushing designs -embracing both modern technology and old world traditions.The Etsy MetalClay Team would like to donate 100% of the sale of this charm bracelet to the Red Cross in a effort to help the people of Japan.


2/22/11

Ten Questions for Julia Rai


Julia Rai is an accomplished metal clay artist and teacher. She teaches a variety of metal clay subjects at several jewelry schools in the U.K., and is also the Director of the Metal Clay Academy, a valuable web site that contains a wealth of information for metal clay enthusiasts. Now, Julia has a new distinction to add to her impressive resumé–she is the first person in the world to achieve the Masters Registry Level Four!


When I read about Julia's latest achievement, a bunch of questions ran through my mind. I began to think I would like to ask her a few things. Then I thought, "hey–why not"? So I asked Julia if she would be willing to answer 10 questions from me, and I wanted to share her answers with you.


Being the generous teacher and all-around lovely person that she is, she agreed!


So, here they are, Ten Questions for Julia Rai. Enjoy!


1. Why did you want to do the Master's Registry?


As soon as I heard about the Registry I knew I wanted to do it. It's the ultimate test of metal clay skills but also addresses something not really covered in many of the classes available, design skills. I wanted to push myself and really challenge myself to see what I could achieve.


2. How long did it take you to achieve level 4?


It's taken me a year to get from Level 3 to Level 4. This was the hardest level as I left projects I was less sure of until later - also, the evaluators expect more of you at each level! I signed up for the Registry as soon as it launched in September 2008 and had achieved Level 1 by March 2009, that was my fastest level.


3. What was the hardest thing you had to work on for the Master's Registry?


The hardest thing is difficult to answer. The nesting rings were very tricky for me to get right and I made five sets before I found one that worked properly. There are a couple of projects that I've submitted three times and still not passed! One is combining metal clay with copper - I just don't seem to be able to get this one right! It won't beat me though...


4. Did any of the projects come easily for you?


Surprisingly, the threaded closure worked first time - and I've never done a threaded item before. It just worked straight away. Now people are asking me to teach them the threaded closure so I need to learn how I did it to pass it on!


5. How much time, on average, did each project take you?


Very hard to answer. Some things took a couple of hours, some have taken weeks and weeks with me coming back to them over and over again. I tend to work on at least three or four projects at once, sometimes as many as seven or eight. Some things are still in progress a year after I started them.


6. Was there a project that you dreaded doing? If so, how was it when you finally did it? (That is, if you've done it yet- I assume you are going on to level 5)


The one I'm really dreading is the miniatures. I keep mulling over what to make but I have no idea how to approach making a scale model of a household item. Especially after seeing Tim McCreight's working tumble polisher! My friend Lesley Messam made a fabulous pair of working scissors - hard acts to follow!


7. Which project was your favorite?


I have a soft spot for the Votive figure which is the frog. She was so lovely to make and is tiny and delightful. But the piece I love the most is the metal clay paper piece which passed at Level 4. I love the shape of the piece and although it was very tricky to make, I'm really pleased with the outcome.


"it is the piece I love the most which hasn't been seen anywhere yet"


8. In hindsight, is there anything you would have done differently?


Loads! There are several that I'm going to do again when I've finished because they scored poorly and I know I can do better. Some just scraped through and the evaluations gave me pointers on how to make them better. The sleeve container pendant is a good example. I loved the piece but I now know more about design and I'd make this one quite differently second time around.


9. What is the biggest thing the Master's Registry has taught you?


Design, design, design! I had no clue about what makes a design good or bad before I started the Registry. The evaluators might say I still don't have a clue at times! But I can see the progression in my work and I'm constantly trying to improve my design skills. Before I started the Registry, I never drew anything before I made it, I'd just sit down and start rolling! But now I plan things from the texture upwards, on paper and also in polymer clay for more complex forms. And I'm constantly looking for shapes and textures in everything around me.


10. What advice would you give to people who are thinking about taking the Master's Registry challenge?


I think it's important for people to understand that the evaluators are not interested in stroking your ego. The Yahoo metal clay group is a supportive and encouraging group but the Registry evaluators will not say nice things about your work, they will pick it apart. Even for my pieces that have passed with 10 out of 10, sometimes the evaluators will tell me what could have been done better. And for pieces that have really missed the point, they sometimes won't mark it, that's a horrible feeling - my work is so bad they won't even bother to mark it! So you need to be pretty resilient and not take it personally - which is hard when you've put your heart and soul into something. I've sobbed after reading some of the harsher evaluations - and I'm not an easy sobber! The reason I've put all the marks and evaluation comments for my pieces on my website is to show people what they can expect. I've had such a lot of positive feedback from people about it, it's helped people to make a decision about whether they can cope with that level of criticism. Having said all this, I would encourage anyone who's really serious about improving their skills to go for the Registry. It will challenge you in ways you can't imagine and will develop you as an artist.


***

I worked on these questions for Julia after a long day and I was pretty tired. Well, wouldn't you know it, I had mistakenly sent her an extra question, which she also graciously answered. So, here is our "bonus" question!


Which score surprised you most (positively or negatively)?


The score that surprised me the most - hmm, difficult to say. I'm always surprised by the ones they decide are so bad they won't even consider them! Why would I send in something I didn't think was up to the job? But for some of them, it's just that I've missed the point of the project - that's the price of being the first!


***

I have so many more questions I could ask Julia and I very much appreciate that she took the time to answer ten…whoops–eleven of them. Thank you, Julia!


Please be sure to check out her web sites:

www.juliarai.co.uk

www.metalclayacademy.com


Julia is very generous in sharing her knowledge and experience, and there is a lot to learn from both sites!


written by ~ Evelyn P. Dombkowski

2/1/11

My adventure with PMC Pro


PMC Pro was introduce to us during the 2010 PMC Conference at Perdue.

I remember being in the auditorium and listening to Tim McCreight talked about this new incredible type of clay. Everybody was so excited to play with it, but to be honest with you; I was not. It was confusing to understand what type of silver it was, they were not saying a lot about the formula. The only thing we knew was that it was the strongest clay in the market because it was an allow of silver and other metal(copper.) 
This new clay is an alloy of 90% Silver and 10% Copper. The clay must be fired in activated carbon inside a stainless steel container. PMC Pro shrinks 15-20%.

After reading about the experience of working with this clay from wonderful artists like Lora Hart and Catherine Davies Paetz, I decided I have to give this clay a chance. I can never say I do not like something I have not try yet !!

Because this clay is much stronger I though making a ring will be the best option.

The color of PMC Pro is darker than any other type of PMC. I noticed the clay does not dry as fast as any other type of PMC.

I made a very long coil of clay to start forming my ring, because of the bigger shrinkage factor in this new clay, I went 4 sizes bigger.

When I was forming the coil I noticed the clay is not as smooth as the PMC3 (this is the type of clay I use to create my work), it takes more time to make the coil but the clay does not dry as fast as PMC3. 

While my ring band was drying in the candle warmer, I continued with my next step.
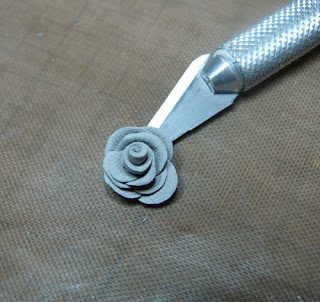
I hand sculpted a rose that I will be adding later in the ring. Hand forming the rose was easy, I did not have any problems at all.
When the clay was dry I started to carve it, most of my work has carving and I wanted to see how this clay works. I usually carve PMC3 and I really like how easy it is to do it. PMC Pro was also easy, I did notice the clay to be not as soft as PMC3 when I was carving it.

©2010 Lorena Angulo
After the carving I added the rose with fresh clay at the bottom and I hand formed little roses and added them fresh into the band.
©2010 Lorena Angulo
 I let the ring dry again and I hand sculpted a bird. This bird was added to the ring with fresh clay.
©2010 Lorena Angulo
©2010 Lorena Angulo
©2010 Lorena Angulo

I fired the ring in the kiln, full ramp to 1400F and hold for one hour. 
This is how it looked when it was out of the kiln.

This is the finish piece!
The total weight in my ring is 8.1 grams

BIRD NEST
©2010 Lorena Angulo
PMC Pro and LOS Patina.


In conclusion:
* The clay is it stronger !!
* I really like the firing to be less than 2 hours !!
* I will use this clay again !! 
* In my personal opinion, the clay works very good for rings; at least some of my style of rings will be great for this new clay.
* I will not stop making my rings with PMC3.I have had no problems with them at all !
* I will keep playing with this clay, maybe making a simple band and later on soldering a pmc3 piece on top.
* I like the clay, and if you are thinking about it; at least give the clay a chance and play with it to see what you think.


Love,
Related Posts Plugin for WordPress, Blogger...