PMC Pro was introduce to us during the 2010 PMC Conference at Perdue.
I remember being in the auditorium and listening to Tim McCreight talked about this new incredible type of clay. Everybody was so excited to play with it, but to be honest with you; I was not. It was confusing to understand what type of silver it was, they were not saying a lot about the formula. The only thing we knew was that it was the strongest clay in the market because it was an allow of silver and other metal(copper.)
This new clay is an alloy of 90% Silver and 10% Copper. The clay must be fired in activated carbon inside a stainless steel container. PMC Pro shrinks 15-20%.
After reading about the experience of working with this clay from wonderful artists like Lora Hart and Catherine Davies Paetz, I decided I have to give this clay a chance. I can never say I do not like something I have not try yet !!
Because this clay is much stronger I though making a ring will be the best option.
The color of PMC Pro is darker than any other type of PMC. I noticed the clay does not dry as fast as any other type of PMC.
I made a very long coil of clay to start forming my ring, because of the bigger shrinkage factor in this new clay, I went 4 sizes bigger.
When I was forming the coil I noticed the clay is not as smooth as the PMC3 (this is the type of clay I use to create my work), it takes more time to make the coil but the clay does not dry as fast as PMC3.
While my ring band was drying in the candle warmer, I continued with my next step.
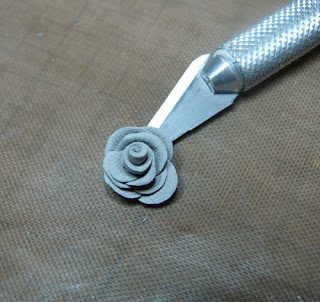
I hand sculpted a rose that I will be adding later in the ring. Hand forming the rose was easy, I did not have any problems at all.
When the clay was dry I started to carve it, most of my work has carving and I wanted to see how this clay works. I usually carve PMC3 and I really like how easy it is to do it. PMC Pro was also easy, I did notice the clay to be not as soft as PMC3 when I was carving it.
©2010 Lorena Angulo |
After the carving I added the rose with fresh clay at the bottom and I hand formed little roses and added them fresh into the band.
©2010 Lorena Angulo |
I let the ring dry again and I hand sculpted a bird. This bird was added to the ring with fresh clay.
©2010 Lorena Angulo |
©2010 Lorena Angulo |
©2010 Lorena Angulo |
I fired the ring in the kiln, full ramp to 1400F and hold for one hour.
This is how it looked when it was out of the kiln.
This is the finish piece!
The total weight in my ring is 8.1 grams
BIRD NEST
©2010 Lorena Angulo
PMC Pro and LOS Patina.
In conclusion:
* The clay is it stronger !!
* I really like the firing to be less than 2 hours !!
* I will use this clay again !!
* In my personal opinion, the clay works very good for rings; at least some of my style of rings will be great for this new clay.
* I will not stop making my rings with PMC3.I have had no problems with them at all !
* I will keep playing with this clay, maybe making a simple band and later on soldering a pmc3 piece on top.
* I like the clay, and if you are thinking about it; at least give the clay a chance and play with it to see what you think.
Love,


11 comments:
Lorena, your ring came out beautiful! Thank you for sharing your experiences with PMC Pro.
Thanks for sharing your process with us Lore! This ring is just beautiful. If you don't mind sharing more... what kind of carving tools do you use? Love all your carved peices.
thanks for sharing! your ring is beautiful.
Thank you !!
Lora: I use the most ordinary of all carving tools !! ;D You can get it in any craft store. Here is a link to the tool I have: http://www.metalclaysupply.com/Hatties-Metal-Clay-Carving-Kit-p/53149.htm
I think Tonya has it also in her website. The "v" tip size I use is #1
Very interesting. Thanks for telling us more about PMC Pro.
Ah yes. Speedball linoleum cutters. I just buy the tips and insert them in a bic pen as the handle. They work great. Thanks for the info.
Lorena, Thanks for sharing your experience. I've been holding off on trying this version of Metal Clay, but think I'll give it a try :)
Thanks Lorena,
you did a great job and your photos are perfect. Beautiful finished ring.
What type of carbon did you fire it in? Anything important in the firing? Love the ring. I have a packet waiting for me at home so maybe in a couple of weeks I'll give a try too.
What a great piece, love the ring and the explanation of the new clay. Just come across your blog but will be back.....thanks
What a beautiful ring, such lovely detail
Post a Comment