I'd like to talk about the difference between low relief and high relief. With metal clay, it's surprising how even a shallow texture can be an unusual and interesting detail - think wallpaper.
Along the way I'm going to take you through a few common and less expensive products that can deliver a nice texture for you if for instance you don't have any silicone molding compound laying around.
First you should get yourself some "Silly Putty" and keep it with you at all times.
You might see something out and about that you could take an impression of and see if what you think might look great, really is or not. "Silly Putty" molds, stretches, snaps, and did you know it bounces too?! HA! Never mind, that's for another topic on another day but in all seriousness, this putty is perfect for testing your textures. The impression with "Silly Putty" will only be temporary. If you really like it, you'll have to go back and get a mold made from stronger stuff.
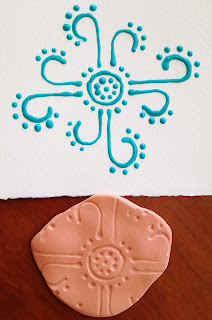
TULIP and Scribbles paint writers are paints in small bottles with small writing tips.
You draw with them and when the paints dry, they leave a raised surface. I like to collect little patterns and I will check through my stash and choose one to draw onto card stock. I keep in mind the size I want to make and depending on the type of metal clay I'm using, I adjust for shrinkage. Then I draw my design with pencil or pen and I'll outline these lines with my paint, squeezing out a fine line that conforms to the lines of my drawing.
Here's a link to a video on the basics of using these paints.
@ $6 for a 4 ounce bottle or $13 for a set of 6, leaves a shiny finish.
How to use Tulip® Dimensional Fabric Paint
1. Shake container. Hold tip to surface and squeeze gently while drawing your pattern. Let it dry flat for 4 hours. You can actually use it at this point for a medium relief texture. 2. For a Super Puffy/deep texture: To puff paint, preheat iron to hottest steam setting. Steam activates paint. Hold iron above paint, but not touching it and steam until the paint rises.
I drew some squiggles and then smooshed it to another piece of paper. I think this would make a great background and you could add fine appliqué details to the top.
A good trick with this media would be to use a heavily textured paper as the base to draw on and then you draw your pattern with a pen and trace over it with the paint. Remember that after the paint is dry, it's usually more compact and the line is thinner than when you first squeezed out the paint. This is a good thing because your picture detail becomes more refined. It's also good to note that each paint tube can have it's own consistency. I had two tubes and one was dense like icing and the other was more liquid and flowing. You can take your chances at the craft store. These tubes need to be punctured to open the flow of the paint so too bad, you can't try them before you buy them.
Martha Stewart has some new molds and here's a set I just got.
I love the stars and the little round caps, heck, I love the whole package! Martha comes through!
*****IMPORTANT WARNING: DON'T USE "Silly Putty" OR ANY OTHER SILICONE MOLDING PRODUCT directly on a silicone product like these Martha molds without a release agent such as a dusting of powder or cornstarch or a light layer of grease. The "Silly Putty" will stick to it and become almost impossible to remove completely and even if you do remove it, the mold may become discolored. This goes for those clear rubber stamps too. BE CAREFUL and try your mold material on a section that you don't plan on using, to test the compatibility of your materials. I'm trying to prevent heartbreak here so please be careful.*****
Back in "Textures 101", I talked about "MOLD-N-POUR", a 2 part molding compound I've used. When any of these textures you've made meet with your approval, just make a mold of it and you'll have your permanent custom mold and can make as many design elements as you want with it. You'll also have the positive and the negative of the pattern in both of these pieces. An idea for a great piece of jewelry would be to make a combination that uses both the positive pattern and the negative in the design.
Some MOLD-N-POUR textures I've gathered.
stars on the street - see my molding compound?
hand towel textures
from a wall in my house
.
and the finished molds
Embossing powders
and stamp your paper (I used a black piece) with embossing ink, dust with embossing powder and shake off excess. Heat with a heat gun until the embossing powder has turned shiny and melted.
It should have a glossy surface and be slightly raised. Make a "Silly Putty" example to see what you made.
dust with embossing powder and shake off excess. heat with a heat gun until the embossing powder has turned shiny and melted. It should have a glossy surface and be slightly raised. Make a "Silly Putty" example to see what you made.
ALWAYS make "Silly Putty" examples of each design after they're made.
or
And last but not least . . .
If you have a plain, simpler deep relief line pattern from a rubber stamp or other texture (even one of these paint pen patterns), after texturing your metal clay with it, place an ephemera skeleton leaf over it and roll again.
You should get your original image with a light filling in of the leaf veins into the empty spaces. You can also do this with lace, mesh window screening and maybe even a textured paper.
Please go out and experiment and see what you can come up with. By no means be limited by my imagination, let yours loose!
TEXTURE IDEA GALLERY
.
.
.
.
.
.
- Catherine Witherell
HappyDayArt!


5 comments:
Catherine, terrific post. Hoping everyone following posts is aware of the Metal Clay by the Bay 2013 conference in San Diego, Aug 9-12, 2013...
Would love to have you attend, as well as participate in Demo night, you would bring lots of interest and knowledge to the event!
Hope to see you there...visit our Facebook group for more info or our website http://www.metalclaybythebay.com
I don't know if my first comment made it, so ... here goes ...
Catherine, thank you for this wonderfully inspiring and thorough post. Also, happy Petaluma, I love it too ... it's my home town with family still living there. Best town in the world imho : )
PS. "Unknown" poster is me, Natalie Knott : )
Great blog post Catherine - really interesting - thanks!
Thanks everyone, glad you enjoyed it.
Natalie, please get in touch if you come back to visit your family! I would love to meet you.
Silver on my Mind, I've definitely heard of your wonderful retreat. Cheers!
Post a Comment